Wednesday, June 30, 2010

My Backyard Garden


Since we moved to our new home in March, I have planted various kind of edible plants on this vegetable bed in the backyard of our house, as seen on the photo above.


It started with the planting of Thai Sweet Basil. That was followed by the Indian Borage. When the Indian Borage started to get invasive, I had to trim some of them. Then I sowed some fresh chilli seeds and now I have sooooo many chilli plants (high density, in my opinion). I have also grown 3 garlic plants. My garlic sprouted and I thought it would be fun to place them into the soil and see the outcome later. My lady finger plant is dying. I just left the stalk in the soil. It's time to remove them.


The chilli plant is grown in my little vegetable bed at my backyard. This is also where I dry my laundry. A skylight shelter is build over it. Although this section gets direct sunlight throughout the day, it is sheltered from the rain.
Although my chilli plants have many buds, but they will drop off. So far, it has yet to produce any chilli yet. I wonder what went wrong.


Another issue that I have with some of my chilli plants are their leaves are dropping. Many of the branches have turned bald and eventually the plant died. Mmmm...what have I done to kill them? Too much water? Not enough sun? Can anyone enlighten me on this? This is my first time growing chillies from seed. I am excited to see the fruit. Unfortunately no such luck yet. Any tips will be appreciated.

Tuesday, June 29, 2010

New Shoot on Hydrangea

My friend, Aunt Poh Poh, gave me a Hydrangea cutting recently. The cutting dried up and the only thing left of it was a dried, hardened branch. As I didn't need the pot, I left the dried cutting in the soil.

When I need to use the pot to grow radishes, I pulled out the dried cutting and found roots forming. Instead of throwing the cutting, I moved it to the side of the pot. I was amazed to find new shoot growing from it recently. Yahoo!! I will have a Hydrangea plant now! I am taking great care of the plant to ensure that it will develop well.


My Hydrangea is currently sharing a pot with my radishes.


----------------------------------------------------------
Facts about Hydrangea:

  • Soil

    One of the coolest aspects of hydrangea is the way soil affects the blooms. In acid soil the blooms are blue. When it's more limey, the flowers are pink. In neutral soil, the bloom is white. You can literally change the color by adding lime to make blue flowers turn pink or aluminum sulfate to make them turn blue. This is caused by a color change of the flower pigments in the presence of aluminium ions.


    Because hydrangeas thrive in rich, moist soils, adequate water and composting are a must. With good soil, annual additions of compost, and a good water retaining mulch, little more needs to be added to have healthy attractive plants.

    However, if your climate or soil poses challenges, then it may be necessary to more aggressively amend your soil, and feed them, especially in the spring, with a high quality all-purpose (10-10-10) plant food. Use a single application of time-release fertilizer.
    Drainage is important. As with most other plants, moist doesn't mean wet. Poor drainage can lead to sickly plants and eventual death.
  • Light

    Partial shade is ideal, but they can take full sun as long as they have some protection from hot afternoon sun that can toast leaf edges. By the same token, too much shade can result in poor flowering.

    An Eastern exposure next to a building or fence provides early morning sun that is vital to flower production, but allows afternoon shade that prevents stressing the plant and frying the foliage.
  • Water

    Water often. If hydrangea is looking wilted, it's very thirsty. If it doesn't get enough water when flower heads are forming, you'll have fewer and smaller blooms later.

    Install a drip irrigation system for your hydrangeas. With regular watering they will reward you with lush growth and beautiful flowers.
  • Pruning & Propagating

    As long as they get enough water, hydrangeas are pretty hardy plants and tolerate a fair amount of neglect and untimely pruning. As such, it's a wonderful plant for the novice gardener. Be forewarned though: If you prune incorrectly at the wrong time or take the wrong cuts, you may easily end up with few flowers next year.

    Hydrangeas, especially the macrophyllas, don't require pruning unless they get really big. Remove dead wood and spent blooms any time to maintain a tidy plant. Different varieties bloom on old wood (last year's growth) or new wood from the current season. It's important to check the plant tag or identify your variety before you start whacking away. If, for example, yours blooms on the tips of spring growth, do your pruning in the summer after blooming has occurred.

    Prune or cut back spent blooms to force development of next year's buds. Thin canes on your plant to develop larger flower heads.

    Hydrangeas are easy to root from stem or tip cuttings in late spring or early summer (May – June). Just take a 6-inch cutting of the plant, remove the leaves on the lower 3 inches and put it in a glass of water on a bright window sill. You can also dip the cut end into a rooting hormone. Place your cutting in damp vermiculite in a bright spot (like an Eastern exposure) to allow root formation. Once the cutting is rooted, you can keep it in a pot until ready to transplant outside.

    When you plant your hydrangea starts depends on where you live. In areas where winters are temperate and the ground never really freezes you can plant your hydrangeas anytime, though fall and winter are best for fostering a strong root system to support the next seasons flowering. If your climate is colder, you'll need to plant in the spring ... for obvious reasons. Keep your young plant in out of the wind. Mulch it well to protect it through the winter.

    (Source: Hydrangea Care)

Thursday, June 24, 2010

Hari Organik Back Again

Thanks to Paddeyfeeny who left me a message that Hari Organik by CETDEM will be held again on 4 July 2010 (Sunday). If you are curious about what this event has to offer you, please check out my previous postings about Hari Organik.

What I intend to do at Hari Organik event?

1) Buy more worm compost (vermincompost). I paid RM12 and got 6 packets of worm compost. I noticed that my brinjal grew so fast when I use this compost in replacement of soil.

2) Visit the CETDEM's Organic Farm and see how the plants are growing. I love this garden. There were abundance of fruits when I last visited. Great photo opportunity.

3) Attend educational talks by organic farmers. It helps me to gain more knowledge about organic food and also how to grow edibles organically in my garden.

4) Buy vegetable/plant seeds from CETDEM. The seeds are only priced at RM1 per packet! Very cheap, right?

5) I wonder if my fellow gardening bloggers from Klang Valley would be keen to meet up here. If yes, we can have a gathering here and meet each other face-to-face. We can also bring a little gift from our garden to be shared with one another. Would anyone be game for this?


Thursday, June 17, 2010

Orchid Show at Shah Alam Lake


Saw this poster about an Orchid Show in Shah Alam on this weekend while visiting United Malaysian Orchid nursery. I thought this would be interesting to our fellow gardeners, especially those who are residing in Klang Valley or nearby.


The Orchid show is held in conjunction with the Shah Alam Lake Symposium.


As Shah Alam is named the Orchid City, thus orchid exhibition and shows are held very regularly. However, the publicity for those shows are poorly done by the organizer. Usually I only find out about the events in the newspaper days after they are over. Therefore, I am very glad to know about this event before it is being held. This time around, I am going to make sure I turn up for it.


For the map of Shah Alam Convention Centre (SACC) where this orchid show will be held, please refer to the map below that I found on the Shah Alam Lake Symposium's official website:


Mulberry Harvest

Two days ago I went to my old place. Saw the mulberry plant had some ripening fruits. I plucked them and glad to say that my harvest is pretty good this round. Initially I planned to add them into my salad but eventually I just popped each of them into my mouth. Ha ha...it's hard to resist fresh mulberry. This time most of the fruits were sour. Alas, I plucked them too early. Usually I have to beat the birds to them. It's ok if I couldn't get sweet mulberries but at least I get to enjoy the high Vitamin C content in them.

Wednesday, June 16, 2010

Lady B's Progress Report

Two buds are found on my brinjal plant, Lady B. It's my first attempt in growing brinjal. I bought a seedling of the brinjal from the Shah Alam Farmers' Market. Lady B is my fastest growing vegetable. I have only brought it home for 5 weeks and it has grown so much taller and even produce 2 little buds for me. I can't wait to see the purple fruits that it will soon bear me.


This was how big Lady B was when I first brought it home.

Tuesday, June 15, 2010

The Radish Adventure

My interest in growing radish was triggered after seeing the radishes grown by my close buddy, Roxanne last year. It took me awhile before I got this interest turned into a reality.


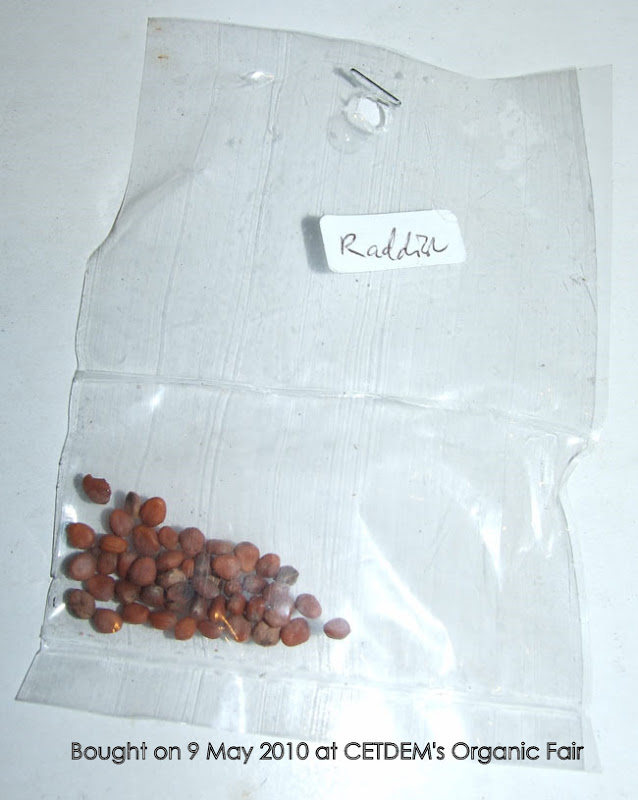
I bought a pack of radish seeds at CETDEM's Organic Fair for only RM1 per pack.


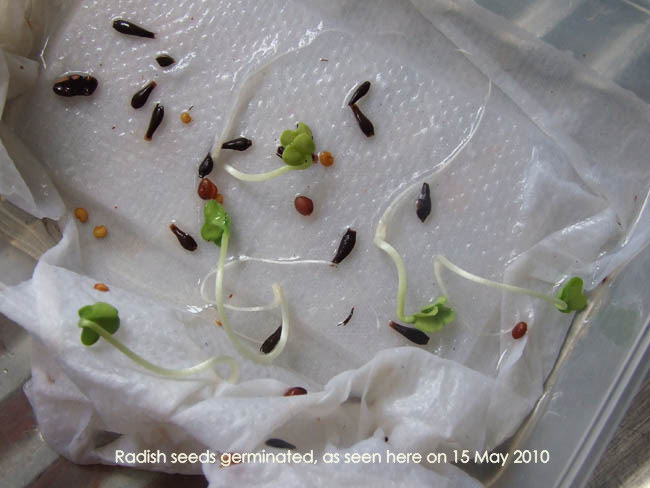
Using the same method used to germinate Adenium seeds that I read in the GCS Forum, I germinated my radish seeds with great success. Unfortunately I didn't take the photos for Step 1 & 2 below. I thought I would take the photo the following day but before I did so the seeds had already germinated! Amazing, how fast that happened!

1) I placed 7 seeds in a cup of water and leave them there till they sunk to the bottom of the cup. It can take a few hours or even overnight for it to happen.

2) Remove the seeds that had sunk to the bottom. I placed them on a damp kitchen paper and kept them in a covered tupperware. The kitchen paper MUST be kept damp. The tupperware was kept COVERED to ensure that the moisture was retained. Spray the kitchen towel with water whenever it was drying up.


Within 2 days of placing the seeds in the tupperware, all of them germinated!!

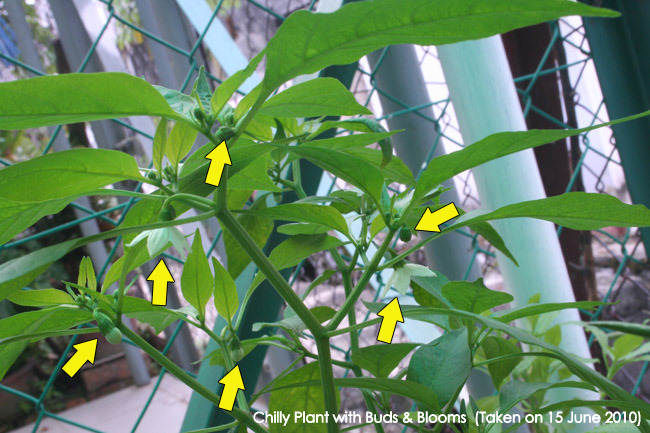
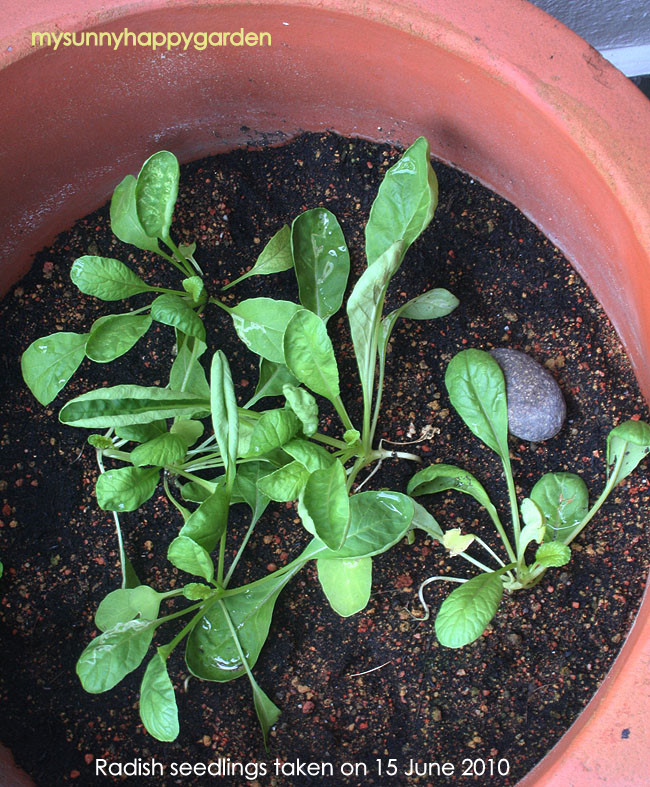
I tried the same steps for my Marigold & chilly seeds. Unfortunately, it didn't work on them. But the Radish seedlings continue to show progress. Within 3 days, the shoots have grown longer and tiny green leaves had appeared.
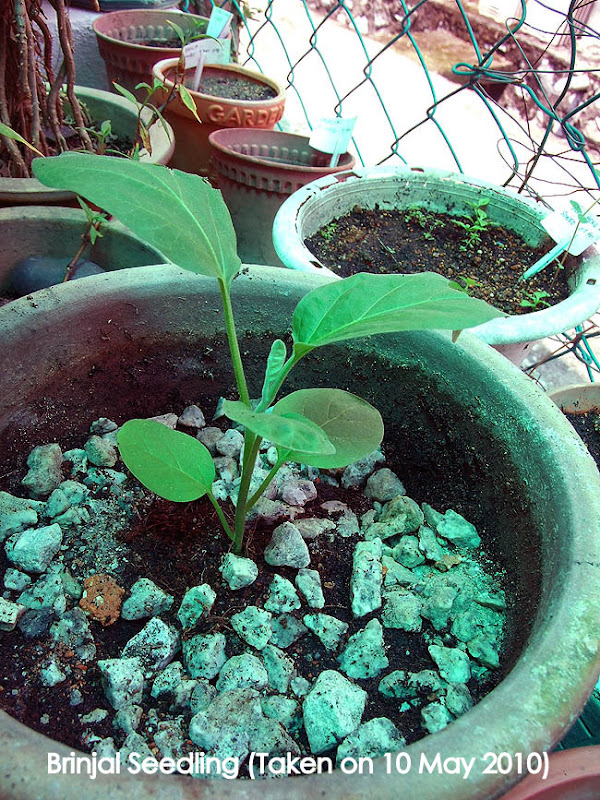
When there are 4 leaves on each of the seedling above, I transplanted them to a pot filled with soil. According to Rox, the soil must be loose to ease the growth of the radish. If the soil is hard and clayish, the radish may find it hard to grow and the result will be skinny radish that protrudes from the soil to the surface.

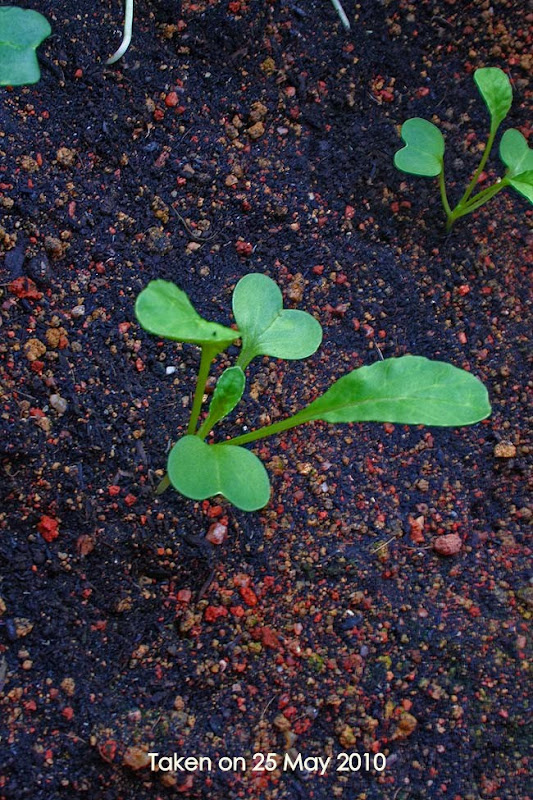
I placed the seedlings in a pot of soil medium that comprise of burnt soil, earthworm compost and some red soil. Within 10 days, these were what I got.

Here are my straggly-looking radishes. There are signs of leaf miner attacks on the leaves (see the white patterns). I hope they will grow well. I am checking on them daily with trepidation.


It reminded me that I am just like Hugh Fearnley-Whittingstall of the River Cottage series shown on Asian Food Channel. I love watching the programme where he holds on to his ethos of self-sufficiency by cooking self-produced vegetables, self-hunted meats, self-catch fishes, self-grown fruits, self-produced liquor in his little cottage called River Cottage, with the help of his friends. As a smallholding farmer, Hugh would wait with trepidation everytime his livestock i.e. cow, pig, sheep or chicken were producing a calf or laying eggs. It's interesting to watch how his small River Cottage farm grows beyond and develop into the 42-acre huge farm (named River Cottage HQ) in his latest programme, "Beyond River Cottage". Catch the interesting River Cottage series if you can on Asian Food Channel. I bet you will find it as interesting as I do.
The radishes have grown taller, as seen in this shot taken today.

Monday, June 14, 2010

Come the Rain

Those of you living in the northern hemisphere may be welcoming the arrival of summer. But for those of us living near the Equator, the weather has been unbearably hot. When we moved to our new place in March, it was difficult to set an appointment with our air-conditioner contractor to come to fix the air-conditioners. He told us that many people were buying and installing air-conditioners in their homes as the weather is getting too hot these days. So he was very, very busy and couldn't give us an earlier appointment!


Arrival of the rain is ushered with a warm welcome. It has been raining nearly every evening!! Its arrival always put a smile on my face. The rain helps lower the temperature of the scorching heat that we are experiencing during the day.
At the same time, I know my plants would grow better with the touch of the rain. Furthermore, these days I don't have to be worried about my vegetables being affected by the rain. I have my edible plants in a vegetable bed at the back of the house. A skylight shade is built over this area that is also used for drying my laundry. It provides enough sunlight to the plants and at the same time a shelter from the rain.


My Costus blooms enjoying a cool shower.


Showers of blessings fell on my Plumeria, Adenium and Jasmine.


Buds on my lady finger enjoying a cool shower too.


Rain, rain come again!


Droplets of water from the rain on the leaves of my lady finger plant.


Another person that is happy when it rains!! Here's Gene Kelly singing 'I'm Singing in the Rain'.

To sing along with Gene Kelly, here're the lyrics to this song "I'm Singing in the Rain".

Doo-dloo-doo-doo-doo
Doo-dloo-doo-doo-doo-doo
Doo-dloo-doo-doo-doo-doo...

I'm singing in the rain
Just singing in the rain
What a glorious feelin'
I'm happy again
I'm laughing at clouds
So dark up above
The sun's in my heart
And I'm ready for love
Let the stormy clouds chase
Everyone from the place
Come on with the rain
I've a smile on my face
I walk down the lane
With a happy refrain
Just singin',
Singin' in the rain

Dancin' in the rain
Dee-ah dee-ah dee-ah
I'm happy again!
I'm singin' and dancin' in the rain!

I'm dancin' and singin' in the rain...
[ADDITIONAL VERSE]
Why am I smiling
And why do I sing?
Why does September
Seem sunny as spring?
Why do I get up
Each morning and start?
Happy and head up
With joy in my heart
Why is each new task
A trifle to do?
Because I am living
A life full of you.

LinkWithin

Related Posts Widget for Blogs by LinkWithin
Custom Search