Sunday, May 30, 2010

Fascinated with Caterpillar


I caught this little fella chowing on the leaves of my Adenium plant. It has been a project that I have wanted to embark on for quite sometime ~ monitoring the metamorphosis of a caterpillar into a beautiful butterfly. So, I gladly place it in a plastic jar and covered it with a paper with holes made on it.

I named this little fella "Ah Pui" (which means "Fatty" in my Hokkien dialect). When I first caught sight of it, this caterpillar was green in colour and much tinier than what it looks like now. It ate voraciously and at least twice a day I had to pluck leaves from my Adenium to feed it. Each morning when I check on it, the leaves in the container would be gone. Only droppings by this caterpillar filled the bottom of the container.

As we are spending this weekend in my hometown in Melaka, I took Ah Pui home with us. Unfortunately my mom's young Adenium plant only has several tiny leaves. I plucked 2 for it. After several hours, the leaves were gone. Concerned that it may die from hunger, I fed it with hibiscus leaves. The next morning, I found it stiff and no longer as soft as the day before.

Oh no!! Did I kill Ah Pui by feeding it with hibiscus leaves? Some brown juice appeared from its body. I was saddened by the incident. Shaking the container didn't produce any reaction from this little fella.

Instead of throwing the container instantly, I kept it next to my sister's little tortoise. This morning when I shook the container, I found Ah Pui moving! Gosh, it's still alive! My Ah Pui is still alive. I was overjoyed!

Will continue to monitor Ah Pui's development and I hope it will grow into a beautiful butterfly soon. Sometimes I feel guilty for capturing this little fella instead of letting it roam in my garden. Be assured that I will return it to nature after it turns into a butterfly. I promise to take good care of it.

Monday, May 24, 2010

Planting Brinjal Seedling

After reading BangChik & KakDah's posting on brinjals in their My Little Vegetable Garden, I feel very keen to try planting brinjal. So, I made a trip to the Shah Alam Farmers' Market to purchase brinjal seeds.

Unfortunatly there is no brinjal seeds available from the Agriculture students stall. So I opt to buy the seedling of a round brinjal for RM2. That's the beginning of my relationship with Lady B ('B' for Brinjal)! I hope it will be a smooth ride for both of us.


I placed Lady B in a pot upon returning home. Lucky that we have a small garden at the back of the house. I grow edible plants here. It has been 2 weeks since I brought this seedling home and seems like it is growing healthily. I look forward to the days when I can share with you photos of brinjals growing on Lady B.

Wish you all a lovely week ahead!

Thursday, May 13, 2010

Marigold vs Mosquitoes

CETDEM members introduced Marigold to me as a plant that can help prevent mosquitoes in the garden. That property in Marigold got me convinced that I must get them planted! In recent months, there have been many cases of dengue fever in our housing area, UEP Subang Jaya. So, if Marigold is a mosquito deterrant, it will be handy for us.

In fact, MPSJ (Subang Jaya Municipal Council) officers were going from house to house this morning and evening to check if there is any contained water that is breeding ground for aedes mosquitoes (the carrier of dengue fever). One will be charged with a summon of not more than RM500 if any larvae is found in the compound of his premise!

Dengue fever can be fatal. I had it 2 years ago and was hospitalized for a week. The doctor informed me that if I get dengue fever for the 2nd and 3rd time, it can be a matter of death then. So, I am all out on the war against aedes mosquitoes!!! Hope you gardeners out there, especially those in tropical countries, will keep a look out NOT to keep any clear stagnant water in your garden or house. Mosquitoes like to breed in this condition.


These are the Marigold seeds that I bought from CETDEM's stall during the recent Organic Day event in SS2. I got 2 packets at RM1 each. There are so many seeds in each packet.


The seeds began to sprout 2 days after they are sowed. Isn't that easy?


After 2 weeks, these are the seedlings that I got from those Marigold seeds. Now I simply sit back and wait for them to grow stronger and produce those vibrant Marigold flowers. At the same time, I hope they will help to deter mosquitoes from visiting my garden! You can try to plant some too! Do make sure you don't keep any clear stagnant water in your garden. Check those flower pot plates and any water features in your garden! Let's together wage a war against aedes mosquitoes!

Wednesday, May 12, 2010

Featured Garden: LP's Pictorial Garden

Today I am going to post about the garden of a closeby neighbour, named LP. LP has a lovely, cosy garden. Just like the pretty owner herself, the garden always make passer-bys turn their heads. It's hard not to take another peep to admire the garden.

After reading about pictorial gardening, I conclude that LP is a pictorial gardener. Why so?

The pictorial gardener is primarily interested in the outline of the tree, the density or solidity of its foliage, its blending faculty, either as a group or in company with other trees, and its color value in relation to other darker or lighter shaded trees.


As pictorial gardeners we broaden our garden horizon. As producers of flowers, the edge of our flower beds or the lot boundary plantation represent all too often the limit of our garden horizon. As painters of garden pictures we extend our vision and include on our canvas that part of the picture already painted by nature. This is especially so in the open country where a distant hillside, a lake or river view, may be made visionally part of our garden picture even though these areas be far beyond
the boundaries described by our deed.


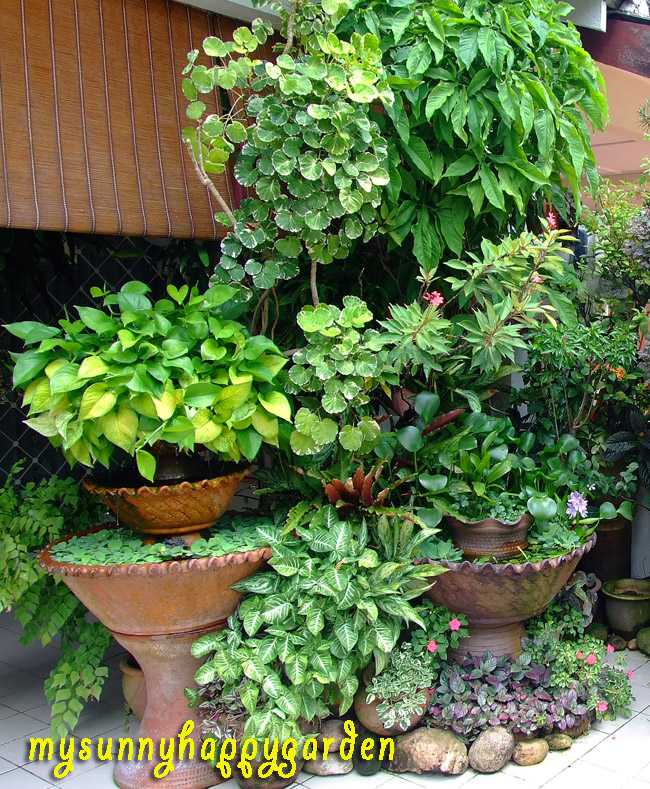
LP's garden comes with a huge collection of foliage in various colours and patterns. The lush greens are dotted with spots of pink, red & purple colours from the few flowering plants she grows. She makes a beautiful vista of her garden by creatively arranged her lush plants in clay pots that comes in various heights and beautifuly displayed with a visual perspective effect in mind. Taller plants form a background for the smaller, dainty ones. River rocks are placed on the foreground to create an attractive border. Viewing her garden, one would know that the owner has put a lot of thoughts into the composition of this beautiful paradise, just like how an artist would plan before painting his brush on a canvas.


In the foreground, there are Goose Foot & Snow Queen (Aglaonema) plant with interesting leaves and a few varieties of folige plants (do help me to figure out their names). I think the flowering plant is an Impatiens.

Placed in the 2 bigger pots are water plants, featuring the purple blooming Hyacinth & Pegaga in one pot and the 2nd pot containing Money Plant (Devil's Ivy) and Water Lettuce.

The tall Polycias with its round, variegated leaves together with the Goose Foot plant are strategically placed as background for the water features. At the same time they help to block passer-bys from viewing into the living room, thus, providing privacy to the home owner.


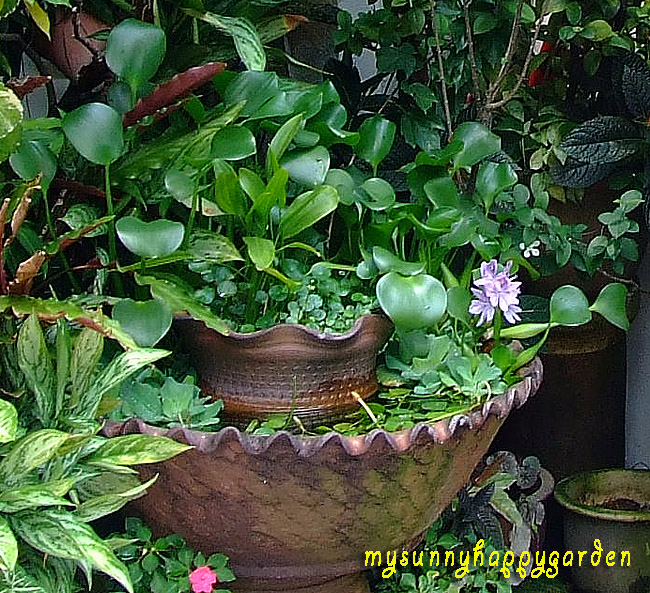
A close-up view of the pot containing the Hyacinth bloom & Pegaga. Also seen is the Snow Queen (Aglaonema) plant on the left and the blooming pink Impatien.

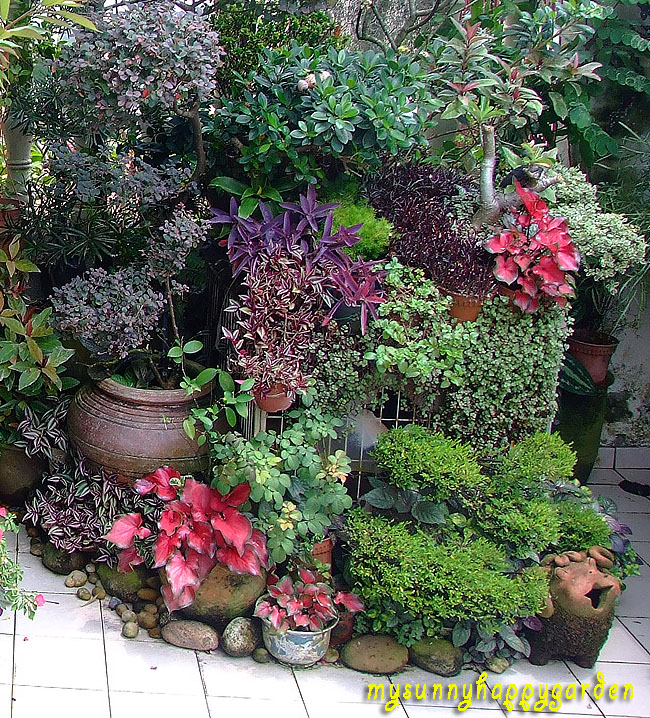
On this nook, LP placed many foliages of various leaf sizes and colours. I like that plant with the fiery red leaves. It brightens up the whole section. The tall plants are cut into topiary, providing shades for the smaller plants placed in hanging pots. The tall plants together with the small creeping plants provide shades to LP's dog cage. This is also a creative way to decorate the dog cage.

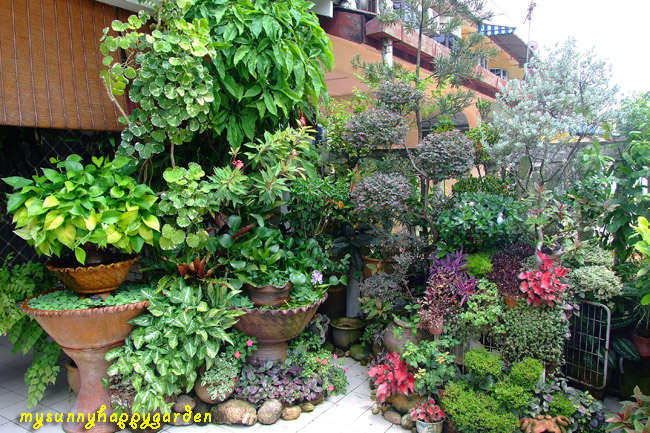
An overview of this section of LP's cosy garden.

Due to limitation of space, plants that require shades are placed under this wooden bench. I love these collection of plants that come in different shapes & patterns with different shades of green on their leaves. Adorable clay snails and turtles are used as decoration.

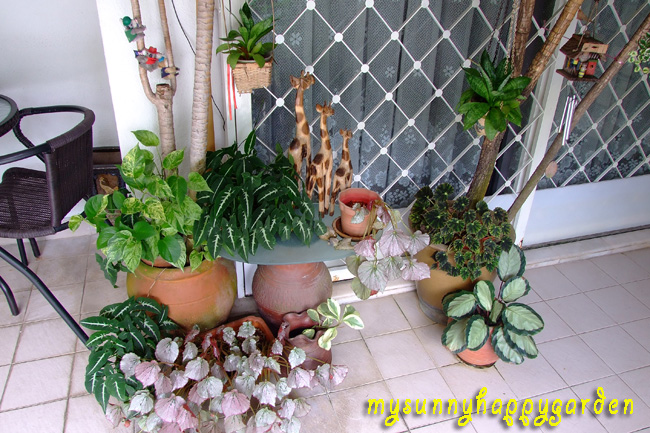
Besides her garden furniture, a piece of glass is placed on top of a pot to form a small table for a pot of Begonia with velvety leaves and a heart-shaped foliage plant. They are joined by the 3 wooden giraffes of different height. A wind chime is hung on her Cane Plant, adding soothing effect on a windy day to this charming corner.


LP's garden is an inspiration to me. Everytime I drove past her house, I would slow down to get a good view on how the garden is doing. I wish my garden would one day be as picturesque as hers!

Tuesday, May 11, 2010

Growing Chinese Celery

While organizing my gardening tools and fertilizers, I found a packet of Chinese Celery (in Chinese, it's called Kheen Choy or in Malay, Daun Sup) seeds that I bought last April from a fertilizer shop in Tangkak town during our trip to Alokarama for the Green Thumb Workshop. I totally forgot that I have these seeds. I sowed the seeds on 9th April and simply hope they will germinate and grow. Through my readings from blogs and forum, some seeds that past its validity may not germinate. So, I didn't give these seeds high hope. However, surprise awaiting me!!! I just saw some Chinese Celery seedling in one of my pots!


For only RM2 per packet, there are many seeds inside the aluminium foil. And the seeds exude the fragrant similar to the one you get from celery.


It's exactly 1 month since I sowed the Chinese Celery seeds. Seedlings are sprouting out from the ground!! I am waiting for them to grow into bushy stalks.
---------------------------------------------------------------------------------
More about Chinese Celery
  • Also known as Oriental Celery. Chinese Celery is the same species as the European variety most people in the West are familiar with, Apium graveolens, but it has a number of important differences. Chinese celery has much thinner stalks and a stronger taste than its European relative. It can range in color from white to dark green. Chinese celery is rarely served raw, but is a common ingredient in cooked Chinese and Vietnamese dishes.
  • Days to harvesting: 100-120 days
  • Information from Garden Guides:

  • Days to Maturity: 45
  • When to Sow Outside: 5 weeks before last average frost date. Seeds will not germinate well is the soil is warm. In warm climates, sow in fall for a winter crop. If protected, it can withstand temperatures as low as 15 degrees.
  • When to Sow Inside: 2 - 4 weeks before you plan to plant out.
  • Seed Depth: Press onto surface of soil.
  • Seed Spacing: 1"
  • Row Spacing: 12"
  • Days to Emerge: 15 to 30
  • Thinning: When 1/2" tall thin to 4" to 6" apart
  • Read the experience of another fellow gardener, Jerry Coleby-Williams's Celery Planting here.


    Monday, May 10, 2010

    Chronicle of Missy Mint

    My first attempt in cooking curry laksa for my neighbourhood friends turned out to be a success. The same went for my first attempt to grow mint using the stems of those mints bought to garnish my curry laksa! Ha ha...luck is on my side now!


    I didn't know that mint is so easy to grow. Just put some cut stems of mint into moist soil and watched patiently if those stems will bear you with new shoots. I have placed several stems into a pot and fortunately one of them was successful!!! What a relief, and joy too!


    I placed several stem cuttings of mint on 25 March. After 3 weeks, I found this young shoots growing from one stem. The rest of the stems wilted & dried, as seen on the photo above & below.


    On the 6th week, it looks so healthy. Now it has 2 stems growing from the mint plant.
    I have added a fishbone plant gotten from my neighbour into this pot as I plan to have the mint as ground cover.


    Two days after I added some organic fertilizer to boost the growth of the mint, the lush leaves from the stem that was growing healthily in my earlier photo started to droop, some even crinkled and turn brown at the edges. My heart pained just by looking at its condition! It's time to reflect on the teaching of Impermanence by the Buddha. One day its healthy and 3 days down the road, it's losing its strength to live on!!! I think I added the fertilizer prematurely. The plant may be too young to be fertilized. I should have waited for another 2 weeks probably!! A case of more haste, less speed!!


    The other stem still look well. I am praying hard that it will continue to flourish. Do you think more water to dilute effect of the fertilizer may help? Or will the water cause the mint root to rot? Please Missy Mint, you must grow well, yah!! Please Missy Mint, live on for me!! I will never dare to over-feed you again!

    Thursday, May 6, 2010

    Kermit's Buddy Came for A Visit


    This little fella came for a visit recently. Caught sight of it hanging around my YTT plant. It's the first time I have seen such a tiny frog. I told myself that I won't allow it to escape appearing here where I can share his visit with other fellow gardeners!

    Who has been visiting your garden lately? Care to share?

    LinkWithin

    Related Posts Widget for Blogs by LinkWithin
    Custom Search