Wednesday, March 24, 2010

In Transition

I have not done any posting since we moved to our new house. It's already 3 weeks since we moved. Still a lot of things to follow through. I didn't manage to bring all my stuffs over from our old house. So I still go back regularly to pick up things that I miss and also to water some big plants that are still there. Yet to figure out how I should arrange them in our new place.


Before we moved, my 3 big pots of bougainvillaes collapsed due to the strong wind during a heavy downpour. Unfortunately, I used wires to tie up the 3 bougainvillae plants together so they can support each other well. They did support each other all the way to their fall! Reminds me of the Three Muskeeters tagline "All for one & one for all"! They were growing so beautifully and pink blooms were showing. I was expecting more blooms as the weather is getting very hot these days and bougainvillae blooms well under such weather! It's sad to see the top broken from the branches. So heart-broken that I forgot to take any photos of them. We had to chop them down and now we have 3 remaining trunks. Hope they will start to shoot and grow again!


Photos of the bougainvillaes taken in September 2009 when they were blooming profusely. I love the 2 pots with the variegated leaves and pink blooms. One pot produces orangey bloom but its flowers are very few. You can see one flower on the top of the second photo.

Friday, March 5, 2010

War Against Mealy Bugs

I have read in Tropical Gardening blog a formulation for an organic mealy bug repellent that was used on the pests that attacked the blogger's papaya plant. The repellent worked successfully in getting rid of the mealy bugs.

My plants have been persistently attacked by mealy bugs. They went for my YTT, Hibiscus, Roselle and also lady fingers.

The mealy bugs would usually be found hiding on the underside of leaves. They thrive under the shady leaves and multiply very fast. If not act upon quickly, they will suck away the life of the plants. They remind me of vampires! As a result, the leaves of plants would have brown spots or gradually turn yellowish. Eventually the leaves would drop off after their nutrients have all been sucked by the mealy bugs.

Some facts about mealy bugs:


Mealybugs damage plants by sucking sap from roots, tender leaves, petioles and fruit. They excrete honeydew on which sooty mould develops.

They excrete honeydew on which sooty mould develops. Severely infested leaves turn yellow and gradually dry. Severe attack can result in shedding of leaves and inflorescences, reduced fruit setting and shedding of young fruit. The foliage and fruit may become covered with sticky honeydew, which serve as a medium for the growth of sooty moulds.

Honeydew, sooty mould and waxy deposits may cover leaves reducing photosynthetic efficiency and may lead to leaf drop. Contamination of fruit with honeydew and with sooty mould reduces its market value. The honeydew attracts ants, which collect the honey and protect indirectly mealybugs from natural enemies. Some mealybugs inject toxic substances while feeding causing deformation of the plant (e.g. the cassava mealybug). Some species transmit viruses (e.g. the pineapple mealybug). (Source: Infonet-Biovision)

That was exactly what happened to my Roselle, as shown in picture below. What remains of my Roselle are only dried leaves & shrivalled branches with some recalcitrant mealy bugs still hanging on to them.


The little white spots that appear on leaves may be a sign of mealy bugs presence. They seem like harmless dust. Another sign of mealy bugs presence is ants! If you can see many ants crawling on your plants with white cottony spots appearing on your plants, most likely your plants have been invaded by mealy bugs. Act fast! If left for too long, a healthy plant will have brown spots like the second photo below showing my lady finger leaf with brown spots. Usually, I will wash off the mealy bugs with water. But this is not a lasting solution. The next day they would return again.


After reading TropicalGardening's blog and some other internet articles, I used the home-made solution below. This is still a trial formulation. I only made 200ml of this solution as they would be enough for one application. I prefer to make fresh new ones for each application. I sprayed them generously on the mealy bugs either early morning or late evening.

Please do not spray this solution when it's hot & sunny as the garbage enzyme may scorch the plants. A little garbage enzymes will go a long way. So do not use too much of it. If you do not have this, you can opt to exclude it.

Be cautious when spraying this solution and ensure that the mixture does not come in contact with your skin or eyes. The spicy mist can hurt one's eyes & skin.

Stay a distance when spraying. The spiciness of bird's eye chilli will be emitted during spraying and can cause one to break into coughs.


Additional information that I found on the Internet:

  • The liquid dish washer helps to cut through the natural oils of a small soft insect body and help water completely enclose the insect drowning it. Soap will also penetrate the insect cell walls and halt respiration. The problems with a soap-based insect repellent is that it is ineffective as soon as it dries on the plant leaves and too much can actually damage the plant being helped.

  • Good spray coverage and good timing is important when using soapy solutions and if oil is added. To be effective they must come in contact with the mealybugs. Crawlers are the easiest to kill, since they are more susceptible and are more exposed than eggs, older nymphs and adults. As they grow, the wax covering their bodies becomes thicker, rendering them more resistant to insecticides. Use with caution soapy solutions and oils. These products may be toxic to some plants causing discoloration or burning of foliage. Prior to applying them extensively, apply to a small, inconspicuous branch or to a few plants and after 48 hours check for adverse reactions. Apply them when the air temperature is cool. Make sure your plants were watered well the day before you apply your control - never spray wilted plants. (Source: Infonet-Biovision)

  • Chilli spray is particularly effective against ants, aphids and other soft-bodied insects.

Wednesday, March 3, 2010

Good harvest - Calamansi lime

Whenever I made sambal belacan (a condiment made of fresh chilli with shrimp paste, Calamansi lime, sugar and salt) , I always wish I have a Calamansi lime plant in my garden that can supply me with ever ready lime that I need. I don't always have ready supply of Calamansi lime in the fridge.

Usually the Calamansi lime sold in the supermarket comes in a big pack of about 20 limes. Before I manage to finish those limes, they would be shriveled up & dried. To me, that is a waste and thus, I don't always buy & keep Calamansi lime for my cooking requirement. Instead, I would substitute the lime with rice vinegar for my sambal belacan. Of course, vinegar doesn't exude the fresh citrus fragrance that makes the ideal sambal. So, I decided it's time to get a Calamansi lime plant for my garden.

I bought my Calamansi plant from the Shah Alam Farmer's Market in Oct last year. It was quite a small plant then. But at RM10, I don't have much complain! During Chinese New Year season, a small pot would cost me nearly double the price I paid.

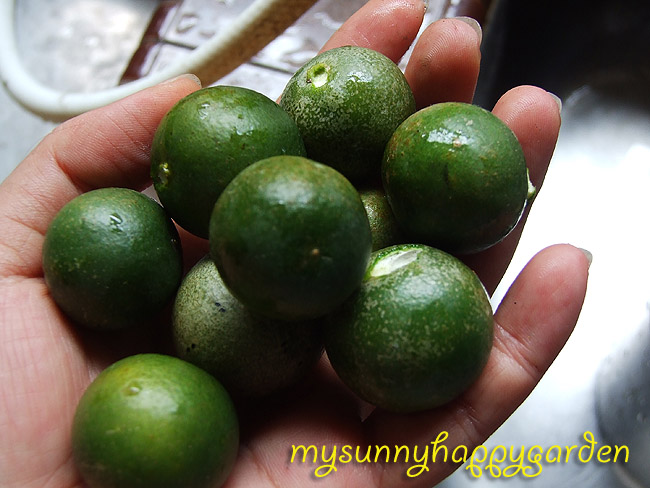
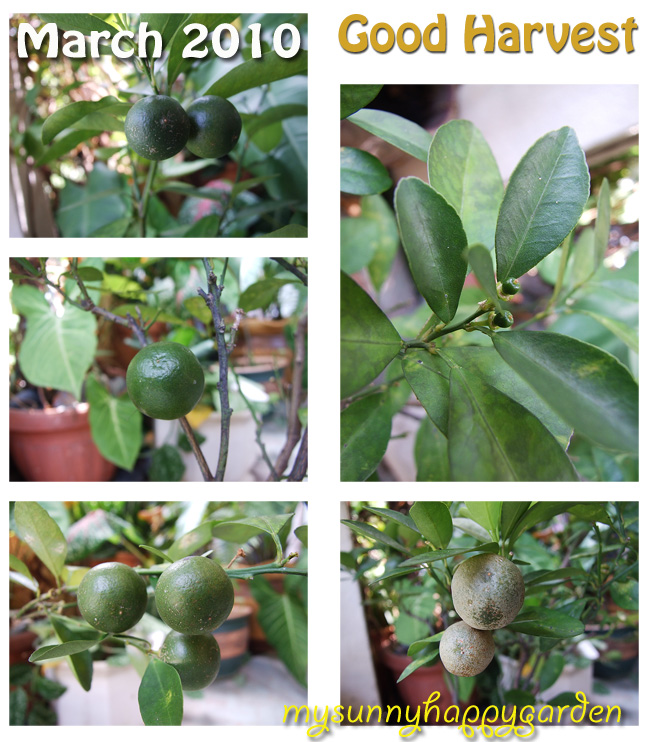
These are the Calamansi limes that I plucked from my garden today. It will come handy in my sambal belacan that will be served with my Chicken Pongteh for tonight's dinner. The remainder will be used for a jug of refreshing, cooling lime juice!


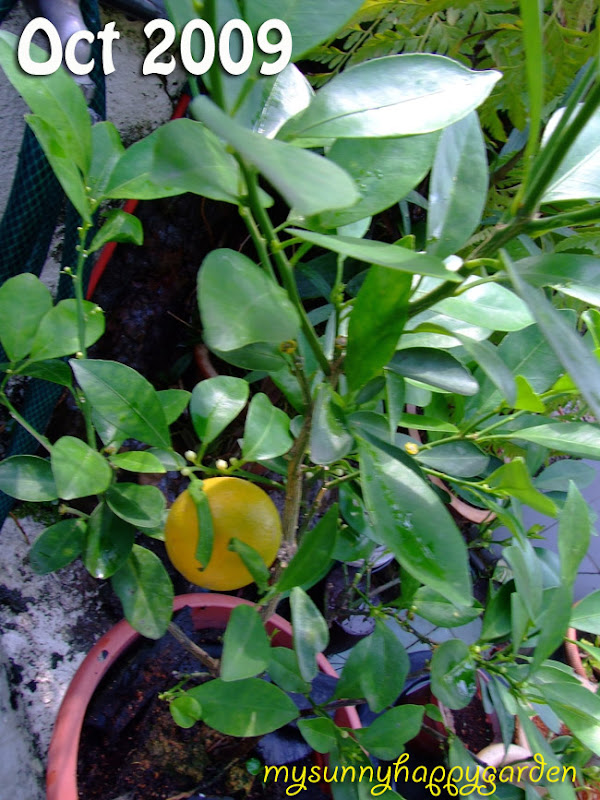
The Calamansi plant that I bought in October 2009 from Pakcik Nazri's stall in Shah Alam's Farmer's Market.


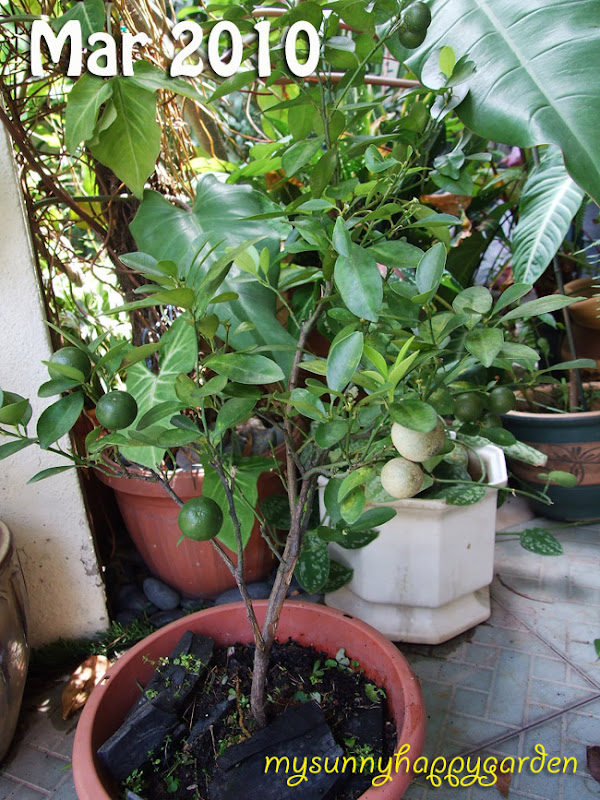
After regular fertilizing and tender loving care, my plant has grown taller and now bear many fruits.


This photo shows the remaining fruits on my plant. I left this smaller fruit for future consumption. You can also see tiny fruits appearing on some branches.


Some facts about Calamansi lime plant and fruit from the Internet:

  • Calamansi lime is a source of calcium, phosphorus and potassium. Thirty-five pieces of calamansi are enough to satisfy a person's daily requirement of 100 milligrams of vitamin C.
  • It is easy to grow calamansi. Generally, a climate with low rainfall and plenty of sunshine is good for the crop. It promotes good flower differentiation, flower and fruit development, and fruit quality.
  • Calamansi can grow and produce well in a wide variety of soil types, except very light, sandy soils, and heavy clay soils. In general, most fruit trees prefer the soil ph to be between 5.5 and 6.5.
  • Like most citrus, there are several ways of propagating calamansi: budding, cuttings, marcotting, or grafting. The planting materials must be free from diseases.

    If you are planting grafted calamansi, dig a hole at least 40 centimeters in diameter and 40 centimeters deep.

    Set the seedlings into the hole and put back the soil mixed with compost. Water the plants daily.
  • To produce big, luscious fruits, the plants must be fertilized regularly. One month after planting, 50 to 100 grams (about one handful) or urea and 16-20-0 (mixed) are applied around each tree. Fertilization is done every four months. Starting on the second year, the fertilizer requirement is increased to 200 to 300 grams (Urea and 16-20-0 mixed) per tree.

    The tree bears fruit after one to two years. By that time, the plants are supplied with complete fertilizer like 12-24-12 NPK at the rate of 1.5 kilograms per tree to increase fruit yield. By the time the tree is 8-10 years old, the fertilizer to be applied should be increased to two to three kilograms per tree. Fertilization is done three times per year.

    Here's one pointer when applying fertilizer: Apply the fertilizer properly by mixing it with the soil. Cover the soil around each tree with dry leaves to conserve moisture. Uproot weeds when necessary.

    Another one: Apply fertilizer to producing trees three times a year: first, during the rainy season before flowering; second, two months after flowering; and the last, after harvesting.
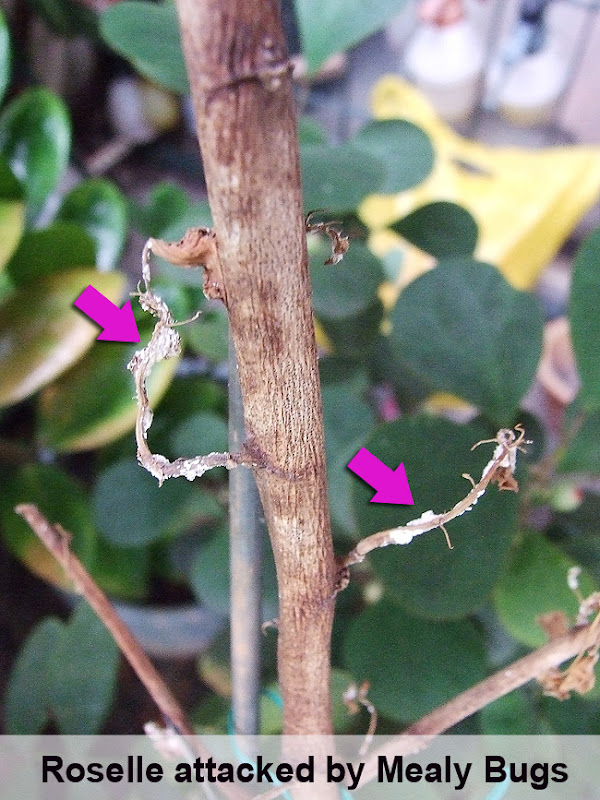
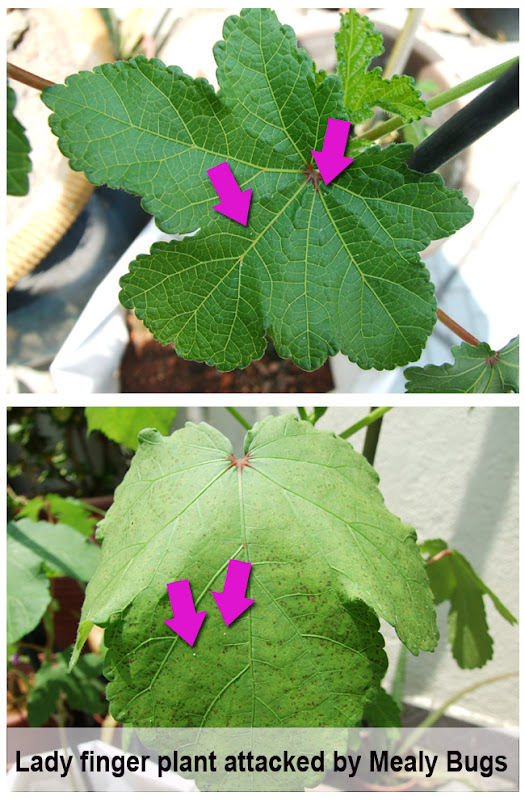
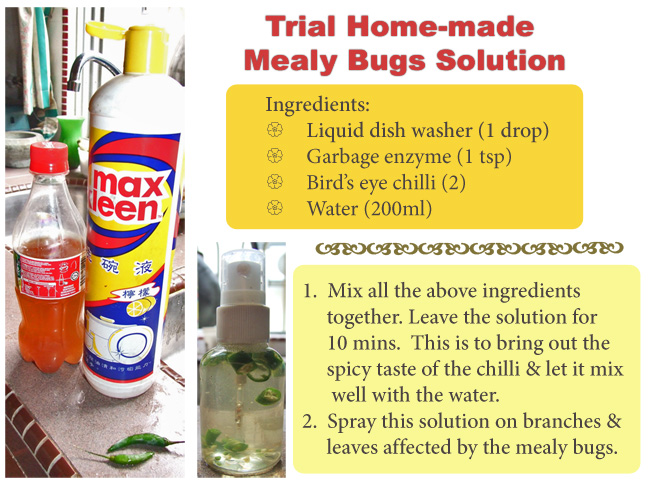
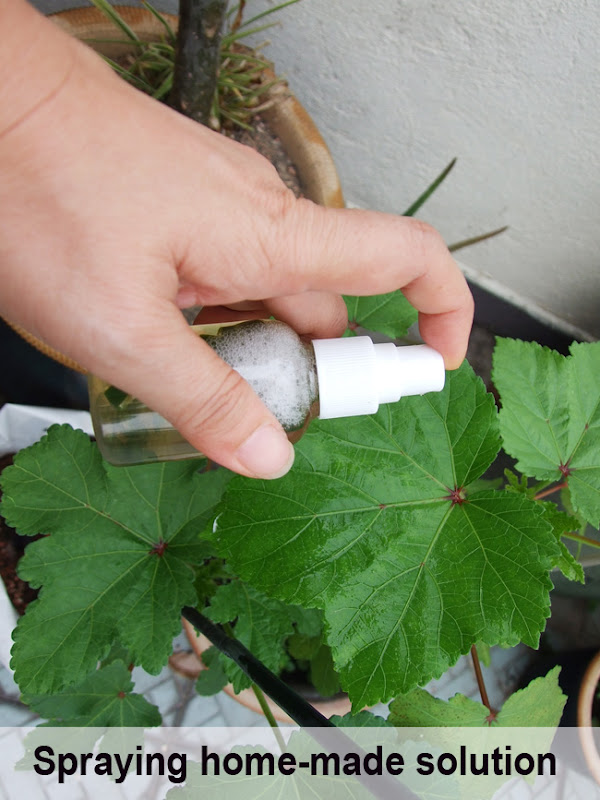
  • To keep the calamansi trees healthy, they must be protected from pests and diseases. To control citrus bark borers, the trees are sprayed with EPN 300 solution. Copper fungicide may also be used for the same problem.

    To prevent the disease from spreading, the infected parts are cut off and burned.

    The aphid is another harmful pest. To control aphids, the trees are sprayed with either Malathion solution (three tablespoons in 5 gallons water), Methyl Parathion (two tablespoons in 5 gallons water), or Diazinon (three tablespoons in 5 gallons water). If aphids have already attacked, the infected portions can be cut off and burned.
  • Citrus Production: A Manual for Asian Farmers shares this information: Maintaining good sanitation in orchard is very important in citrus health management. Twigs and fallen leaves should be collected from under and around the trees, and either buried or burned.

    Covering the soil surface with a grass or straw mulch is an effective way of reducing levels of disease, as well as improving the soil. Covering the soil within 30 centimeters of the trunk with a layer of straw helps prevent infection of the roots with fungus diseases.
  • In harvesting, detach the fruits from the branches either manually or using a scissor. Take care not to damage the branches or the leaves. You will have better quality fruit if you leave a portion of the stem attached to the fruit and do not tear the skin of the fruit when you harvest.

    If you look at the first photo carefully, I have tore some skin off one of the fruits when plucking it. If I had read this article before harvesting my Calamansi limes, I would be more careful!

Are You A Coffee Drinker?

As a coffee drinker, I am delighted to find that the used coffee ground from my daily brew can be used to benefit my plants.

From online research, I found out that coffee grounds contain several substances that promote healthy plant growth. They contain nitrogen, tannic acids and other nutrients. Acid-loving plants especially respond to coffee grounds and coffee.

Why should you put used coffee grounds in your garden?

The high content of nitrogen in coffee grounds is a very good mulch for fast-growing vegetables. Nitrogen encourages foliage & general growth.

Coffee-ground mulch will help reduce the ravages of slugs and snails. Use coffee grounds to mulch plants that slugs love to feast on, such as hostas, ligularias and lilies. Coffee-ground mulch will help promote healthy growth in daffodils and other spring bulbs as well.

How do I use Coffee grounds?

Usually my morning brew is made from coffee grounds that comes in sachet form or freshly ground coffee beans. After drinking my coffee, I will leave the sachet or coffee grounds aside. When I see the sachets piled up, I will tear them up and collect the coffee grounds in a pail. Water will then be added. Let the coffee grounds soak in the water for about 10 minutes. Then water your plants with the water & the coffee grounds. This diluted coffee grounds acts as a gentle, fast-acting liquid fertilizer.


Other ways you can use coffee grounds in your garden:

  • Sprinkle used coffee grounds around plants before rain or watering, for a slow-release nitrogen.
  • Dry the coffee grounds and work into the soil around acid loving plants.
  • Some types of acid loving plants are: azaleas, blueberries, butterfly weed, camellias, cardinal flowers, cranberries, ferns, gardenias, heathers, heaths lupines, mountain laurels, oaks, pecans, rhododendrons, spruces, yews.
  • Add used coffee grounds to compost piles to increase nitrogen balance. Coffee filters and tea bags break down rapidly during composting.
  • Mix used coffee grounds into soil for houseplants or new vegetable beds.

Monday, March 1, 2010

My Father's Garden by Mirko Faienza

Here is a very nice macro shots of a garden & activities that took place in it. Beautifully shot by Mirko Faienza as he discovers a whole tiny world in his father's small garden. There is a small pond with small water falls, some stones, plants, and plenty of micro life! This video was shot on Panasonic 500- Fujinon 17x7.6 HD lens. Enjoy!!

My Father's Garden from Mirko Faienza on Vimeo.

LinkWithin

Related Posts Widget for Blogs by LinkWithin
Custom Search